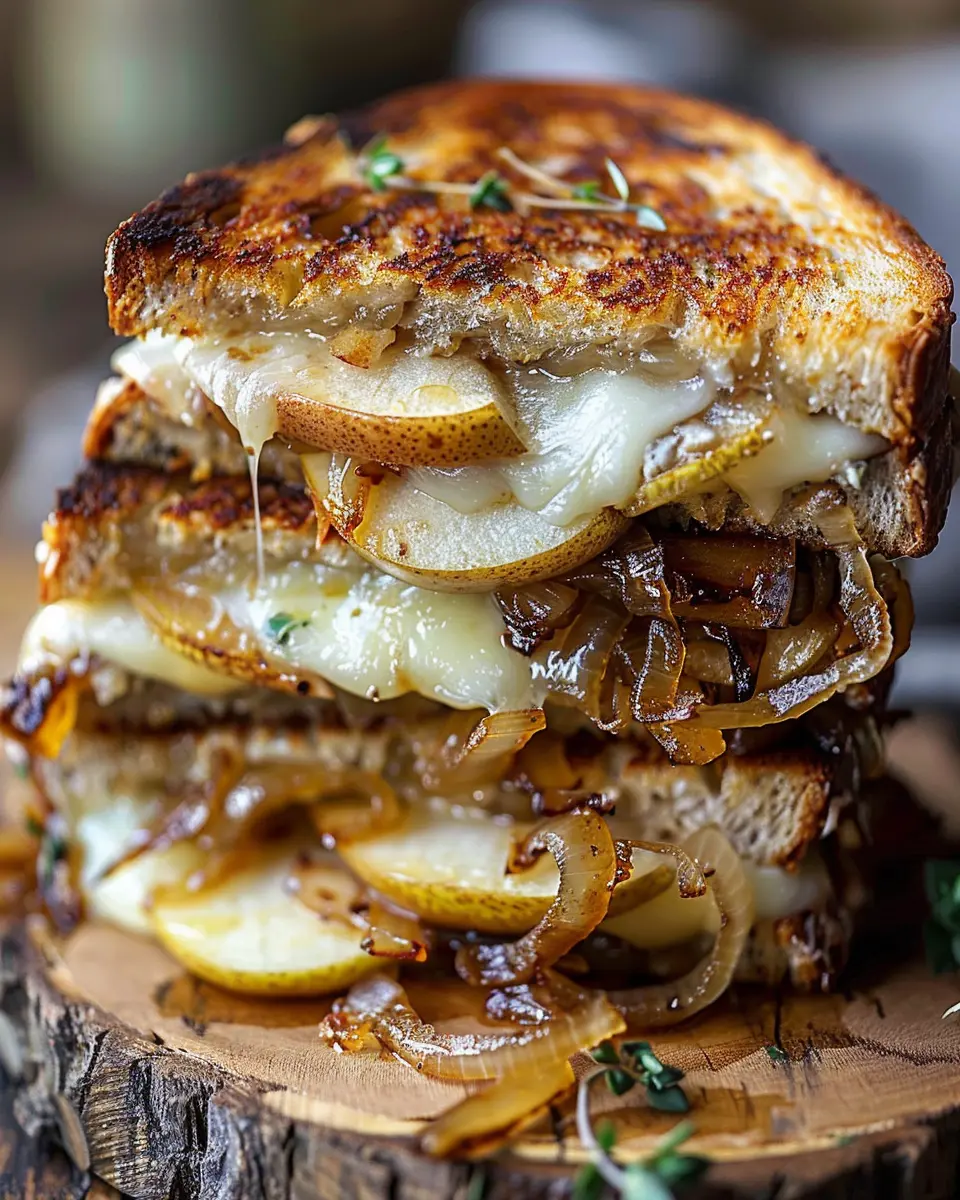
Introduction to Pear Apple Grilled Cheese
When you think of grilled cheese sandwiches, what typically comes to mind? If you’re like most, warm, gooey cheese nestled between toasted bread is probably at the top of your list. But what if I told you that adding fruits like pears and apples could elevate this comfort food into something extraordinary? Enter the pear apple grilled cheese, a delicious fusion that’s not only a treat for your taste buds but also surprisingly easy to make.
Why Pear Apple Grilled Cheese is a Game Changer
Imagine sinking your teeth into a warm, melty cheese sandwich, only to be greeted by the sweet and juicy flavors of fresh pears and crisp apples. This combination is truly a game changer. The subtle sweetness of the fruits complements the richness of the cheese beautifully, making every bite a delightful surprise.
Adding ingredients like caramelized onions provides an earthy depth that balances the sweetness, pushing this dish from everyday to gourmet. Plus, combining savory elements like turkey bacon or chicken ham adds a unique twist, transforming your traditional grilled cheese into a satisfying meal that feels fancy yet grounded.
But why stop there? According to experts at the USDA, incorporating fruits into savory dishes can enhance flavor profiles and improve nutrient intake. In a world where health is increasingly a priority, this grilled cheese offers a clever alternative that you can feel good about indulging in.
When it comes to preparation, the beauty of this pear apple grilled cheese lies in its simplicity. It’s perfect for busy young professionals seeking a quick yet fulfilling meal. Whether you’re whipping it up for lunch or a cozy dinner, this recipe offers versatility to cater to various preferences—vegetarian, savory, and even a little sweet.
So, are you ready to up your grilled cheese game? Dive into this recipe, and transform the ordinary into the extraordinary. Trust me, once you try this dish, you’ll wonder why you hadn’t thought of it sooner!
Ingredients for Pear Apple Grilled Cheese
Essential Ingredients for a Mouthwatering Sandwich
Creating a delicious pear apple grilled cheese is all about selecting the right ingredients to balance flavors and textures. Here’s what you’ll need for this delightful dish:
-
Bread: Choose a hearty artisan bread or your favorite sourdough to provide a crisp exterior and soft center. Good quality bread is key!
-
Cheese: A combination of sharp cheddar and creamy Brie can elevate your sandwich, offering a rich depth that pairs beautifully with sweetness.
-
Fruits: Fresh, ripe pears and apples are essential. Opt for a variety that’s sweet yet slightly tart, such as Honeycrisp apples and Bartlett pears, for the best flavor contrast.
-
Caramelized Onions: Sautéing onions until golden brown adds a sweet and savory element that enhances your pear apple grilled cheese.
-
Turkey Bacon or Chicken Ham: For added texture and protein, incorporating turkey bacon or chicken ham gives an extra bit of savory goodness.
For technique tips, you might want to check out The Kitchn’s guide to grilled cheese for some expert advice on perfecting your grilling technique. After all, a great grilled cheese is all in the method!
Step-by-Step Preparation of Pear Apple Grilled Cheese
When it comes to comfort food, nothing quite hits the spot like a classic grilled cheese sandwich. But why not elevate this timeless dish with fresh fruits and sweet caramelized onions? This pear apple grilled cheese is not just a meal—it’s an experience. Ready to dive in? Let’s walk through the preparation step by step.
Gather Your Ingredients
Before we hit the stovetop, let’s make sure you have everything on hand. Here’s what you’ll need:
- Bread: Opt for a sturdy type like sourdough or whole grain to hold up against the juicy filling.
- Cheese: A combination of sharp cheddar and creamy brie offers the perfect flavor balance.
- Fruits: You’ll need ripe pears and crisp apples. Varieties like Anjou pears and Honeycrisp apples work well!
- Turkey bacon: For a deliciously savory touch.
- Onions: Yellow onions caramelized to sweet perfection.
- Butter: For grilling your sandwich to a golden brown.
- Honey or maple syrup: Just a drizzle to enhance the sweetness of the fruits.
Ensure you have your favorite skillet or griddle on standby, and you’re ready to go! If you’re unsure of your ingredient choices, check out this guide on cheese pairings to create the ultimate flavor explosion.
Caramelize the Onions
Caramelized onions add a depth of flavor that makes this pear apple grilled cheese truly special. Here’s how to do it:
- Slice the Onions: Cut your onions into thin slices. Aim for uniformity so they cook evenly.
- Heat the Skillet: In your skillet, melt a tablespoon of butter over medium heat.
- Add the Onions: Toss in the onions and stir them well. Season with a pinch of salt to help draw out the moisture.
- Cook Low and Slow: Keep the heat low; we’re aiming for patience here! Stir occasionally for about 20 minutes, until the onions turn a beautiful caramel color.
- Finish with Sweetness: If desired, add a splash of water and a drizzle of honey or maple syrup in the last few minutes to enhance the flavor.
The transformation of these humble onions into sweet, golden strands is nothing short of magic!
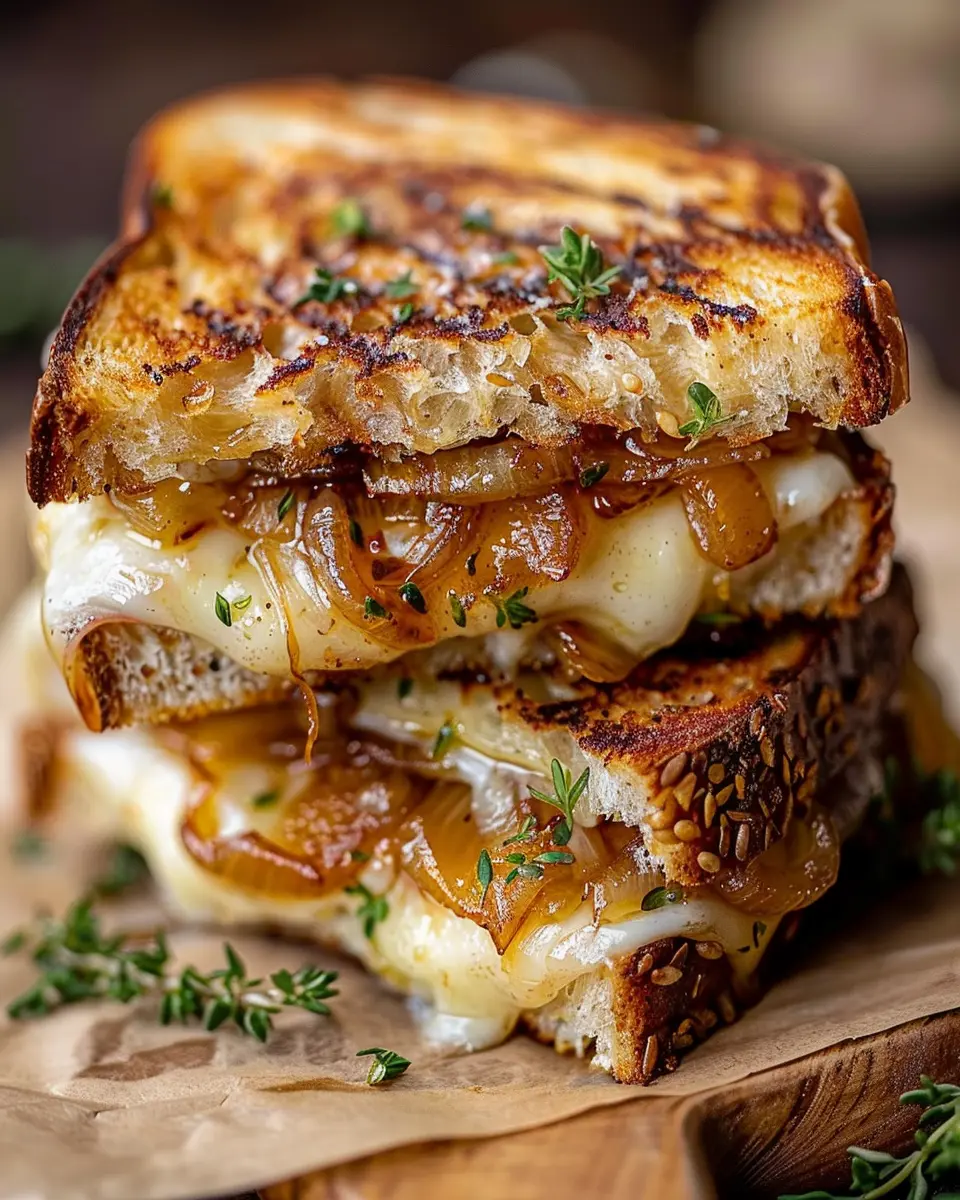
Layer the Ingredients for Maximum Flavor
Now that your onions are ready, it’s time to assemble the pear apple grilled cheese. The order of layering can make a big difference:
- Spread Butter: Start by spreading a thin layer of butter on one side of each slice of bread.
- Cheese First: Place a slice of cheddar cheese directly on the unbuttered side of one slice of bread. This will create a shield to protect the bread from moisture.
- Fruits and Fillings: Layer sliced pears and apples evenly over the cheese. Add the caramelized onions and crispy turkey bacon. Top with a slice of brie.
- Top It Off: Place the second slice of bread on top, buttered side facing out.
This layering technique not only ensures that each bite is packed with flavor but also allows the cheese to melt beautifully around the fruits.
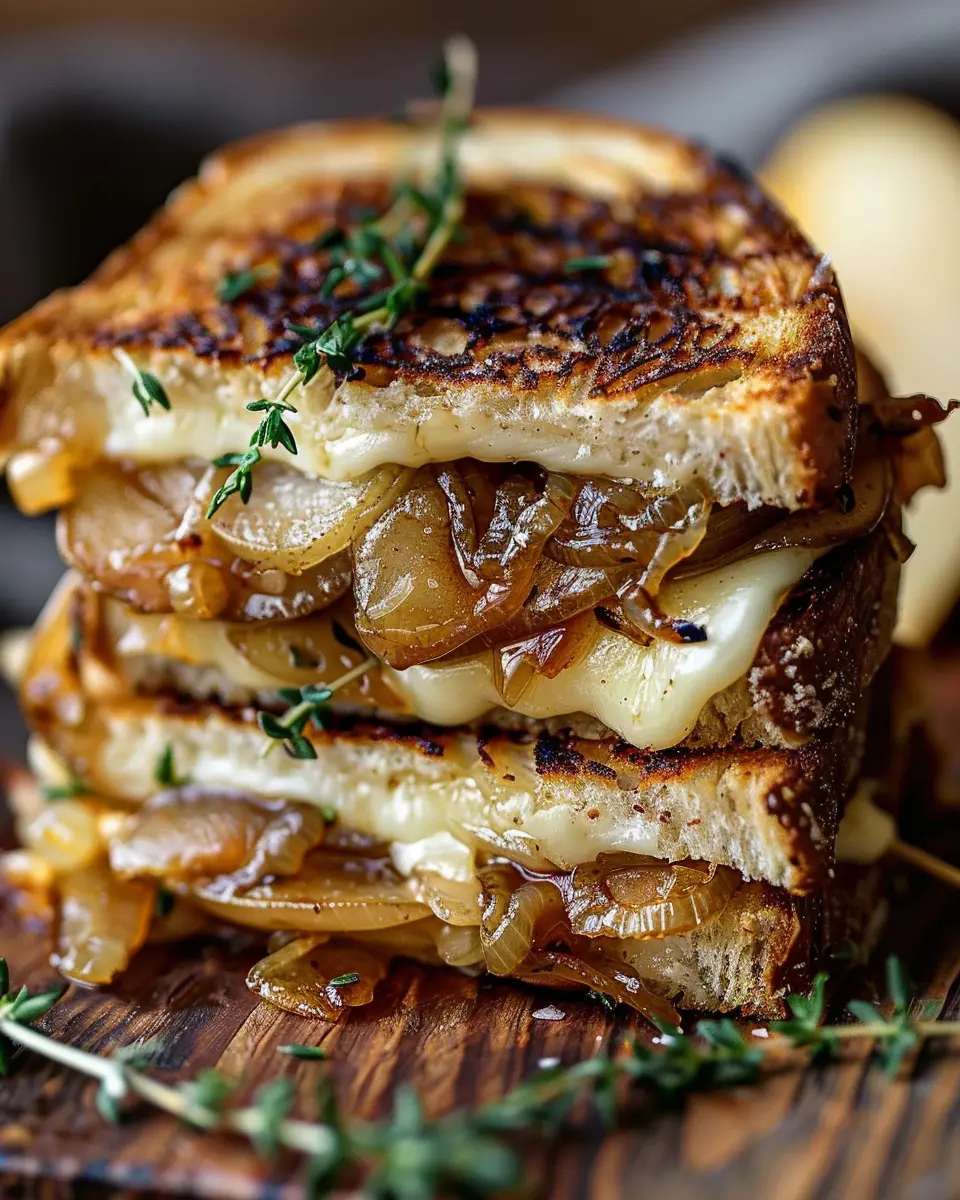
Grill to Perfection
It’s time to bring this pear apple grilled cheese to the grill!
- Heat the Skillet: Preheat your skillet on medium-low heat.
- Grill the Sandwich: Carefully place your assembled sandwich into the skillet. Press down gently with a spatula.
- Monitor Cook Time: Grill for about 4-5 minutes per side, or until your bread turns golden brown and the cheese melts gooey.
- Check for Doneness: If the bread is browning too fast but the cheese isn’t melting, lower the heat!
Serving Your Delicious Creation
Once your sandwich is grilled to golden perfection, remove it from the skillet. Let it sit for a minute—this will allow the cheese to set slightly and make it easier to slice.
You can serve your pear apple grilled cheese with a side of tangy apple chutney or a simple green salad. It also pairs well with a warm cup of chamomile or a refreshing glass of iced herbal tea.
Take a moment to appreciate your culinary creation and prepare for some oohs and aahs when you share it with friends or loved ones. They won’t believe how easy it was to whip up such a gourmet delight!
So there you have it, a delightful twist on grilled cheese that’s sure to impress! Enjoy every cheesy, fruity bite.
Variations on Pear Apple Grilled Cheese
When it comes to pear apple grilled cheese, the delicious combinations are almost endless! Here are a few variations that will elevate your sandwich game and keep the flavors interesting.
Adding Turkey Bacon for Extra Crunch
Want to amp up the savory aspect of your pear apple grilled cheese? Incorporate crispy turkey bacon! The smoky crunch of turkey bacon pairs beautifully with the sweet notes of the pear and apple. Simply cook the turkey bacon until it’s crispy before adding it to your sandwich. The result? A delightful texture contrast that elevates the entire experience.
Exploring Cheese Combinations
While classic cheddar and gouda are always winners, don’t be shy to explore other cheese options. Consider trying brie for a creamier touch, or a sharp blue cheese for a bold, tangy vibe. Mixing cheeses can enhance the flavor profile of your pear apple grilled cheese dramatically. For a fun twist, try melting some pepper jack for a spicy kick. The creaminess of the cheese complements the sweetness while the spice adds a surprising depth.
Spice it Up with a Cinnamon Twist
For those who love a little sweetness, why not add a sprinkle of cinnamon to your sandwich? It complements the fruits beautifully and warms up the flavors, making your pear apple grilled cheese perfect for cozy evenings or chilly brunches. You can mix the cinnamon into the butter before spreading it on the bread or even sprinkle it directly on the apples. Just a pinch can take your sandwich from ordinary to extraordinary!
With these variations, your pear apple grilled cheese will not only satisfy your cravings but also surprise your taste buds every time! Try these ideas out for yourself, and let your culinary creativity shine.
Cooking Tips and Notes for Pear Apple Grilled Cheese
The Importance of Quality Bread
When it comes to your pear apple grilled cheese, the bread is not just a vessel—it’s a flavor player. Opt for artisanal varieties like sourdough or whole grain to elevate your sandwich. A sturdy bread holds up to the juicy apples and caramelized onions without turning soggy. Plus, a crusty exterior creates that perfect crunchy contrast with the melting cheese. Remember, freshness matters! Check out King Arthur Baking for some great tips on selecting and storing bread.
Perfecting the Cheese Melt
Choosing the right cheese is vital for achieving that gooey, indulgent melt. A mix of sharp cheddar and creamy Gruyère works wonders, providing depth and richness alongside the sweet accents of pear and apple. To enhance meltability, shred your cheese instead of using slices; it helps it melt more evenly. For best results, grill your sandwich on low to medium heat, allowing the cheese to melt thoroughly while the bread toasts perfectly. Have you ever wondered why some grilled cheeses are just so much better than others? The secret often lies in patience and heat control!
Serving Suggestions for Pear Apple Grilled Cheese
Pairing with a Fresh Salad
When it comes to pear apple grilled cheese, nothing complements its delightful sweetness quite like a fresh salad. Think about a simple arugula salad drizzled with a light vinaigrette. The peppery greens and tangy dressing create a perfect contrast to the soft, melty cheese and the fruit’s natural sugars.
Here are a few quick salad ideas to try:
- Mixed greens with sliced almonds and a citrus vinaigrette
- Spinach salad with cranberries and goat cheese
- Quinoa salad with cherry tomatoes and cucumbers
These options add a refreshing crunch and balance the richness of your grilled cheese. Plus, incorporating fresh produce can help you meet your daily vegetable intake. Who doesn’t feel good about that?
Complementing with Tomato Soup
For a comforting classic, pair your pear apple grilled cheese with a homemade tomato soup. The acidity of the tomatoes complements the sweetness of the pears and apples beautifully, creating a harmonious flavor profile. This classic combination is like a warm hug on a chilly day.
To enhance the experience, consider adding some fresh basil or a sprinkle of chili flakes to your soup for an extra flavor kick. With its creamy texture and vibrant taste, tomato soup can elevate your lunch or dinner to a whole new level.
So, grab your favorite bowl and savor this delicious duo! Need inspiration for your soup recipe? Check out this easy tomato soup for tips that will leave you wanting more.
Time Breakdown for Pear Apple Grilled Cheese
Preparation Time
Getting started with your pear apple grilled cheese is a breeze. You’ll need about 10 minutes to gather your ingredients, slice the pears and apples, and prepare everything for cooking. This short prep time makes it ideal for busy weeknights.
Cooking Time
Once your ingredients are ready, it’s time to fire up the pan! Cooking this delightful sandwich will take around 15 minutes. You’ll want to caramelize those onions beautifully while ensuring the cheese melts perfectly, so keep an eye on it, but don’t fret—it’s worth it!
Total Time
In just 25 minutes, you’ll have a satisfying and scrumptious meal ready to enjoy. For young professionals juggling work and personal life, this pear apple grilled cheese is the perfect solution for a gourmet touch without spending all evening in the kitchen.
By the way, you can elevate this dish further by pairing it with a simple green salad or a refreshing side of apple slices. Don’t forget to check out resources like Bon Appétit or Serious Eats for more delicious serving ideas!
Nutritional Facts for Pear Apple Grilled Cheese
When indulging in a delightful pear apple grilled cheese, it’s good to know what you’re nourishing your body with. Each serving approximately contains:
Calories Per Serving
With around 400 calories, this grilled cheese is a satisfying treat without going overboard. This makes it perfect for a cozy lunch or a light dinner when you’re seeking comfort food.
Protein Content
A serving of this pear apple grilled cheese delivers about 15 grams of protein. Pairing it with some turkey bacon or a side of nuts can give you an even greater protein boost to keep you energized throughout your busy day.
Fiber and Other Nutrients
Filled with fruits like pears and apples, this grilled cheese offers dietary fiber, which is essential for digestion. You can expect around 4-5 grams of fiber per serving. Plus, expect a dose of vitamins and minerals, particularly vitamin C from the fruits and calcium from the cheese. For detailed nutritional info, you may find useful resources over at Healthline and USDA Food Composition.
Enjoying a pear apple grilled cheese means you savor something delicious while keeping your nutrition in check! What’s not to love?
FAQs about Pear Apple Grilled Cheese
Can I make this sandwich in advance?
Absolutely! Preparing your pear apple grilled cheese in advance can save you time on busy weekdays or when hosting guests. Simply cook the sandwich according to the recipe instructions, let it cool, and then store it in an airtight container in the refrigerator. When you’re ready to enjoy, simply reheat it using one of the methods below.
What are some good substitutions for the ingredients?
Don’t have all the ingredients? No problem—flexibility is key in cooking! Here are some substitutions you can consider:
- Bread: Use whole grain, sourdough, or gluten-free bread if necessary.
- Cheese: Sharp cheddar can be substituted with gouda or havarti for different flavor profiles.
- Fruits: If you’re out of pears or apples, consider peaches or figs for a unique twist.
- Turkey Bacon & Chicken Ham: You can swap these for regular turkey or even a layer of avocado for a vegetarian option.
These substitutions can keep your pear apple grilled cheese fresh and exciting!
How can I reheat my pear apple grilled cheese?
To retain the deliciousness of your pear apple grilled cheese, reheating it is key. Here are a couple of methods:
- Skillet: Heat a skillet over medium heat, add the sandwich, pressing gently with a spatula, and cook for about 3 minutes on each side until golden and warm.
- Oven: Preheat your oven to 350°F (175°C). Place the sandwich on a baking sheet and heat for about 10 minutes.
Using these methods ensures your sandwich stays crispy and delicious, just as it was when freshly made! If you’re interested in more tips on reheating grilled cheese, check out food experts like the Kitchn.
Feel free to reach out if you have more questions about making the perfect pear apple grilled cheese!
Conclusion on Pear Apple Grilled Cheese
The Joy of Homemade Comfort Food
Cooking is often about more than just satisfying hunger; it’s an opportunity to create something uniquely yours. The pear apple grilled cheese with caramelized onions is a delightful fusion of flavors that’s sure to bring comfort to any meal. It marries crisp fruit with gooey cheese, elevating a classic dish into a gourmet experience.
Imagine the satisfaction of taking a bite into perfectly melted cheese, sweet pears, and savory caramelized onions, all nestled between your favorite bread. This recipe not only makes for a delicious dinner but also offers a fun way to impress friends or unwind after a busy day. So, gather your ingredients and treat yourself to this delectable dish—trust me, your taste buds will thank you! For more tips on making culinary magic at home, check out recipes at Serious Eats or Food Network.
Print
Pear Apple Grilled Cheese: Indulgent Delight with Caramelized Onions
- Total Time: 35 minutes
- Yield: 2 servings 1x
- Diet: Vegetarian
Description
A delicious grilled cheese sandwich featuring the sweetness of pears and apples, complemented by caramelized onions.
Ingredients
- 2 slices of bread
- 1 ripe pear, sliced
- 1 apple, sliced
- 1/2 cup shredded cheese (such as Gruyere or Cheddar)
- 1 onion, thinly sliced
- 2 tablespoons butter
Instructions
- Heat 1 tablespoon of butter in a skillet over medium heat. Add the onion and cook until caramelized, about 10-15 minutes.
- In another skillet, melt the remaining butter and place one slice of bread in the skillet.
- Add a layer of cheese, followed by apple and pear slices, then more cheese. Top with another slice of bread.
- Cook until the bread is golden brown, then flip and cook the other side until the cheese is melted.
- Serve with the caramelized onions on the side or inside the sandwich.
Notes
- Try different types of cheese for variations in flavor.
- Serve with a light salad for a complete meal.
- Prep Time: 10 minutes
- Cook Time: 25 minutes
- Category: Sandwiches
- Method: Grilling
- Cuisine: American
Nutrition
- Serving Size: 1 sandwich
- Calories: 400
- Sugar: 10g
- Sodium: 600mg
- Fat: 20g
- Saturated Fat: 10g
- Unsaturated Fat: 7g
- Trans Fat: 0g
- Carbohydrates: 40g
- Fiber: 4g
- Protein: 15g
- Cholesterol: 40mg
Keywords: Pear & Apple Grilled Cheese, Caramelized Onions, Grilled Cheese Sandwich