Introduction to Old-Fashioned Butter Mints
The nostalgia of homemade sweets
There’s something incredibly heartwarming about homemade sweets that whisks us back in time. For many, old-fashioned butter mints evoke memories of grandmas in the kitchen, crafting treats for family gatherings or special occasions. The aroma of butter and sugar wafting through the home brings a cozy sense of nostalgia. Many of us can recall savoring these delightful mints during holidays or at weddings, often passed around in decorative bowls. There’s a sentimental charm to munching on a soft mint that melts in your mouth, reminding us of simpler times.
In today’s fast-paced world, we often find ourselves seeking moments of warmth and comfort. Engaging in time-honored traditions, like making our own sweets, becomes a way to slow down and appreciate life’s little pleasures. Whether it’s making these old-fashioned butter mints for a bridal shower or simply to enjoy with friends, revisiting these recipes can be a delightful way to create new memories while honoring the past.
Why old-fashioned butter mints are relevant today
With the resurgence of interest in homemade, artisanal foods, old-fashioned butter mints are more relevant now than ever. As young professionals, many of us are searching for authentic experiences that connect us to our roots. Making these mints at home not only empowers us to create something delicious but also allows us to customize flavors and presentations.
Here’s why embracing this classic treat makes perfect sense:
-
Healthier Ingredients: Unlike many commercially available options, homemade mints allow you to control the quality and type of ingredients you use. You can choose organic butter and natural flavors, ensuring a more wholesome treat.
-
Creative Expressions: The beauty of making your own mints is the endless possibilities for customization. Experiment with different flavorings or colors, creating a unique twist that reflects your personality.
-
Connection and Tradition: Sharing homemade sweets fosters connection, whether with family, friends, or even coworkers. It’s never just about the mints; it’s about the stories and moments they create.
For those interested in diving deeper into the history and craft of sweets, I recommend checking out resources like Serious Eats or Food52 for a plethora of insights and tips.
Embrace the charm of old-fashioned butter mints and make a batch that brings a little bit of nostalgia into your modern life. Each mint carries not just flavor, but a story waiting to be shared.
Ingredients for Old-Fashioned Butter Mints
Creating old-fashioned butter mints is a delightful experience, and getting the right ingredients sets the stage for that sweet nostalgia. Here’s a quick list to guide you through the essentials.
Essential ingredients
To whip up a batch of these minty delights, you’ll need:
- Powdered Sugar: The main ingredient that gives these mints their sweetness and smooth texture.
- Butter: Use unsalted butter for that rich, creamy flavor that’s oh-so-important in homemade confections.
- Milk: Just a splash to bind everything together.
- Peppermint Extract: For that classic minty freshness—feel free to adjust the amount based on how strong you want the flavor to be.
Optional ingredients for customization
Want to make your old-fashioned butter mints even more special? Consider these extras:
- Food Coloring: A few drops can turn your mints into an eye-catching treat.
- Other Extracts: Try vanilla or wintergreen for a unique twist on the classic flavor.
These simple yet versatile ingredients allow you to craft mints that are not only delicious but also a fun and personal treat. For more insights on similar sweet recipes, check out The Spruce Eats. Happy mint-making!
Step-by-Step Preparation of Old-Fashioned Butter Mints
Making old-fashioned butter mints may seem like a relic from the past, but these delightful treats are perfect for any occasion—from weddings to holiday festivities. With their creamy texture and minty flavor, they’re bound to charm everyone’s taste buds. Let’s roll up our sleeves and jump into the preparation with these easy steps!
Gather Your Ingredients
Before diving into the fun of making old-fashioned butter mints, it’s crucial to have your ingredients ready. This not only speeds up your process but also helps you stay organized in the kitchen. Here’s what you’ll need:
- 1/2 cup unsalted butter, softened
- 4 cups powdered sugar
- 1/4 cup milk
- 1 teaspoon pure peppermint extract (or other flavors if you prefer)
- Food coloring (optional)
- A pinch of salt
Feel free to explore different flavors like vanilla or chocolate! For extra guidance on how flavors can transform your mints, check out this insightful article about flavor pairing on Serious Eats.
Whip Up the Butter Mixture
Once all your ingredients are prepped, it’s time to create the buttery base. In a mixing bowl, begin by creaming the softened butter until it’s light and fluffy—about 2 to 3 minutes. This step is essential as it incorporates air, giving your mints a delightful texture. Add the milk, salt, and peppermint extract, mixing until the ingredients are well combined.
Think of this stage as the groundwork for your mints; it’s where the magic begins!
Combine with Powdered Sugar
Next, you’ll want to gradually incorporate the powdered sugar into your butter mixture. I recommend adding it one cup at a time to avoid a sugary cloud explosion! Mix on low speed until thoroughly blended. You’re aiming for a thick, dough-like consistency. If it seems too dry, a bit more milk can help smooth it out, but be cautious not to make it too runny—your mints need to hold their shape.
Infuse Color into Your Mints
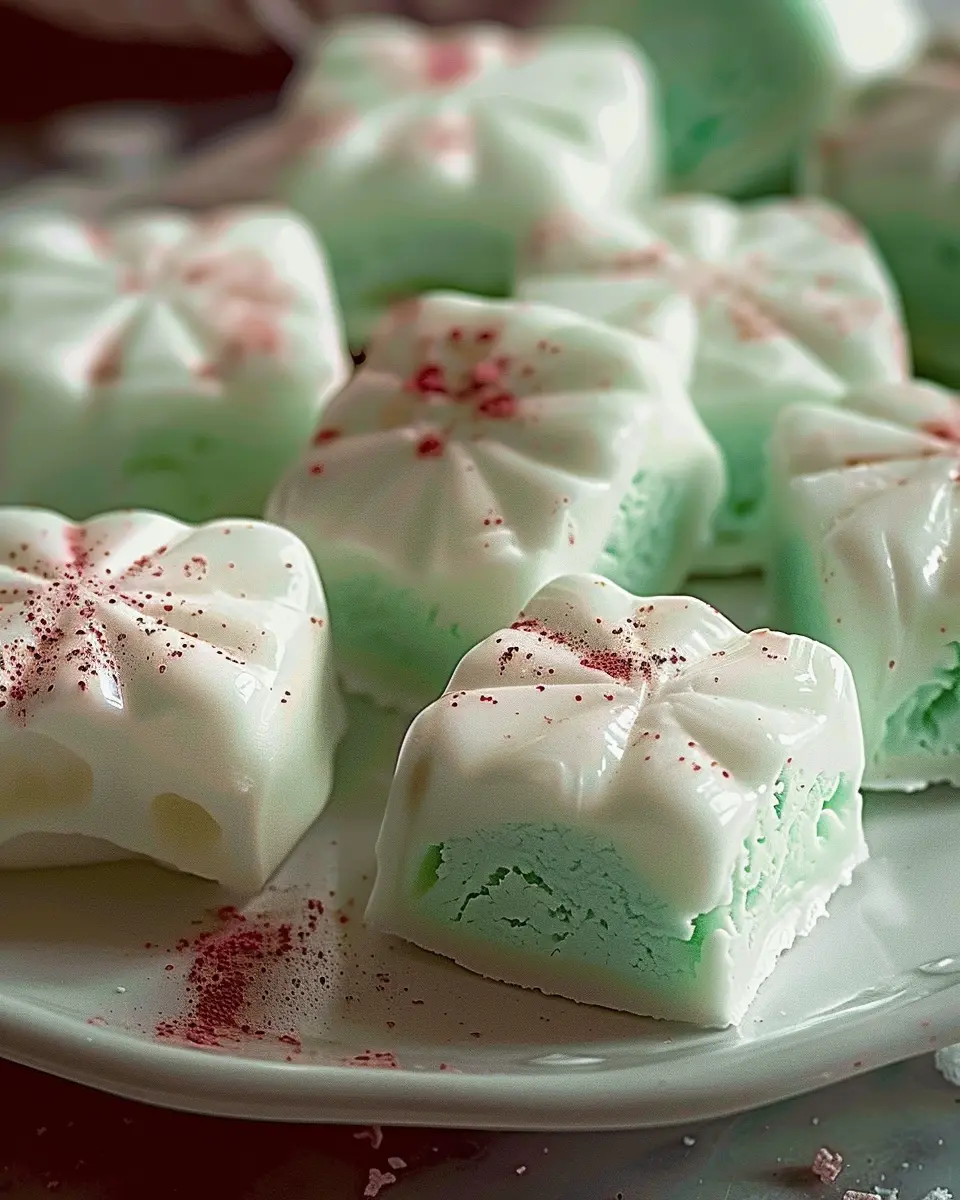
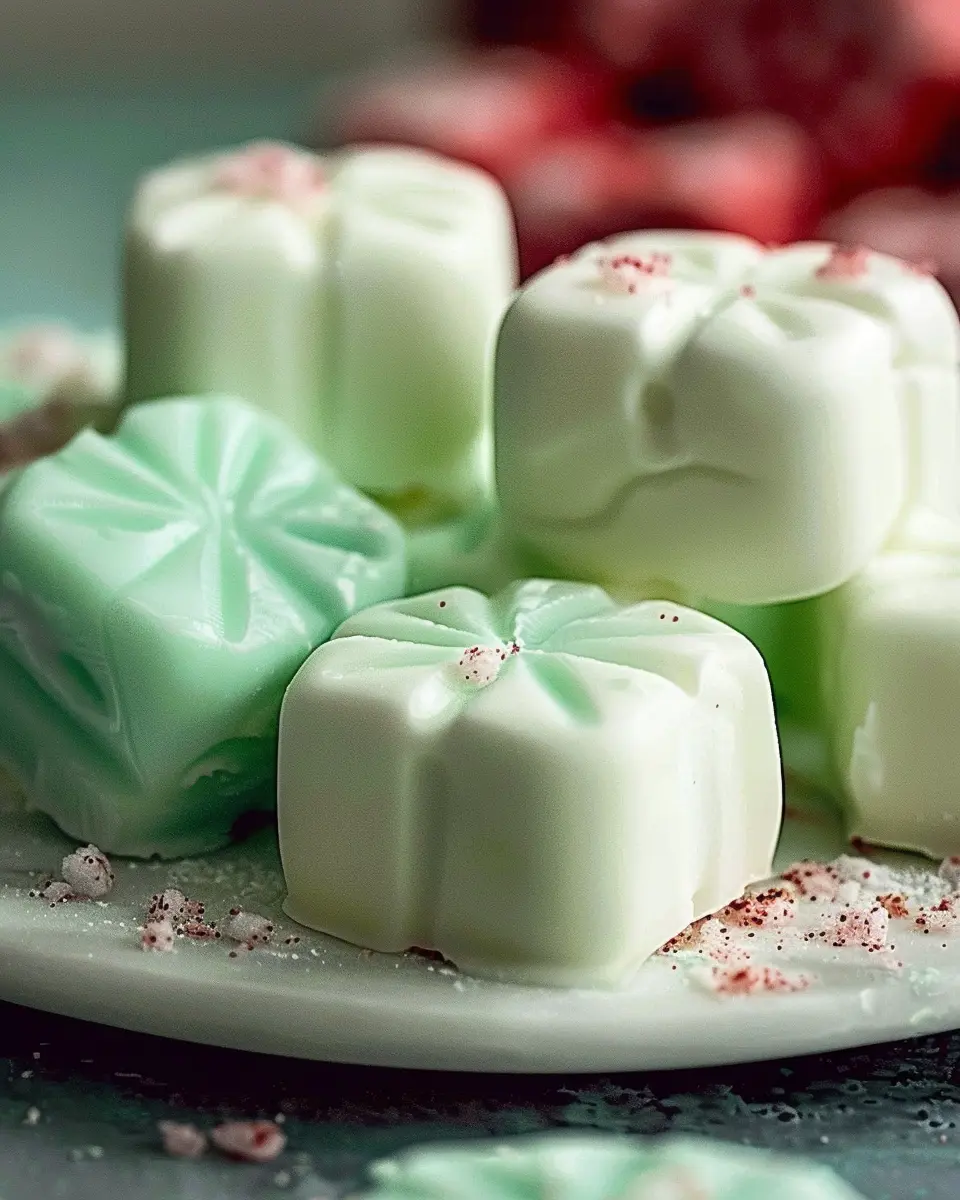
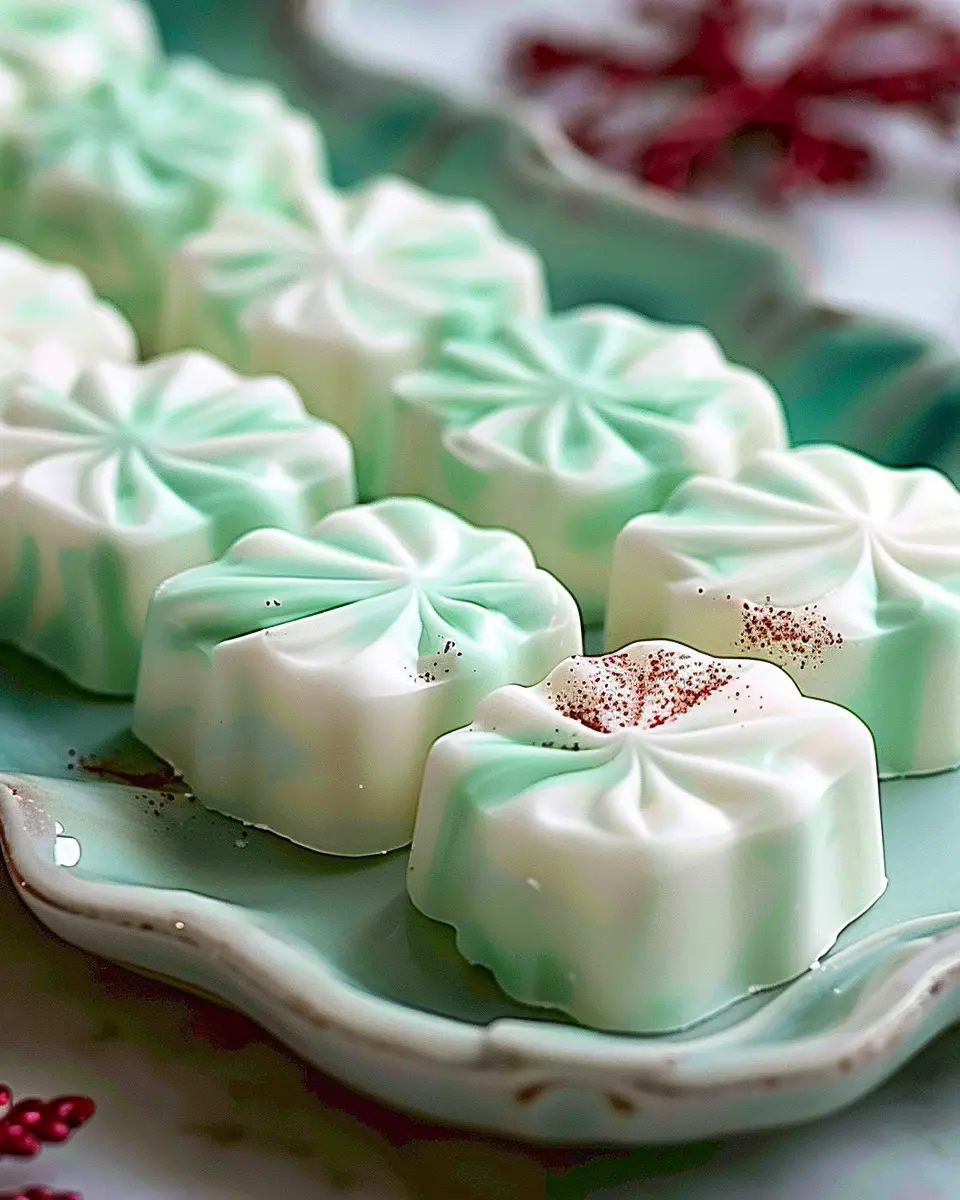
Now comes the fun part—adding color! If you want to make your old-fashioned butter mints visually appealing, incorporate a few drops of food coloring. You can create pastel shades or go bold with bright hues. Simply knead the coloring into the dough until well-incorporated. Consider using a color palette that matches the theme of your event or holiday!
Shape Your Mints
Now that your buttery mixture is ready and colorful, it’s time to shape those adorable mints. Pinch off small amounts of dough and roll them into tiny balls—about the size of a marble works well. Then, flatten them slightly before placing them on a baking sheet lined with parchment paper. If you want a bit of flair, you could use a fork to create decorative patterns or a candy mold.
Let Them Set and Store Perfectly
Once shaped, it’s essential to let your old-fashioned butter mints dry properly. Leave them out for at least an hour to firm up. If you live in a humid area, consider placing them in a cool, dry spot. For storage, keep them in an airtight container at room temperature. They can last for up to two weeks—if they last that long!
And just like that, you have a batch of homemade butter mints that evoke nostalgia and taste utterly delicious. These delightful treats are perfect for sharing with friends and family or even enjoying yourself while reminiscing over the good old days. For more timeless sweet recipes, feel free to explore some classic options at Epicurious.
With a bit of practice, you’ll be whipping up old-fashioned butter mints like a pro!
Variations of Old-Fashioned Butter Mints
Colorful Themed Butter Mints
Who says old-fashioned butter mints have to stick to the standard pastel colors? You can easily jazz them up to suit any occasion! Think about customizing your mints for birthday parties, holidays, or even weddings.
- For a Spring Fête: Use vibrant pinks, purples, and yellows.
- For Winter Celebrations: Cool blue and white combinations look festive and chic.
- For Halloween: Add orange, black, or purple hues for a spooky twist.
Just a few drops of food coloring during the mixing process can transform your mint creations into colorful delight. It’s a fun way to express your creativity and makes for a great talking point!
Flavored Variations Beyond Peppermint
While classic peppermint is a crowd-pleaser, the world of old-fashioned butter mints is rich with possibilities. Want to shake things up? Consider these flavor alternatives:
- Chocolate Mint: Add cocoa powder to the mix for a twist that chocolate lovers will adore.
- Vanilla: Swap out peppermint extract for vanilla for a creamy, comforting flavor profile.
- Spiced Cinnamon: For a unique holiday touch, incorporate ground cinnamon or cinnamon extract.
Experimenting with flavors means you can craft the perfect mint for your palate or to match an event’s theme. Plus, it’s a fun way to keep your mint-making interesting!
By incorporating these variations, you can both elevate your mints and leave your guests craving more. Who knew that making old-fashioned butter mints could be such a delightful adventure? Need more ideas? Check out Serious Eats for inspiration!
Cooking Tips and Notes for Old-Fashioned Butter Mints
Importance of Softened Butter
When making old-fashioned butter mints, it’s crucial to start with softened butter. This allows for easier mixing and ensures a creamy texture that binds the sugar and flavorings beautifully. If your butter is too cold, it won’t integrate well, leading to a grainy finish. Just let it sit out for about an hour before you start, or gently microwave it for a few seconds—just be careful not to melt it!
Tips for Kneading Color Evenly
Achieving the perfect hue for your old-fashioned butter mints can be tricky. When adding food coloring, knead the dough gently at first to avoid creating uneven patches. Divide the dough into smaller portions, dye each separately, and then combine them for an ombre effect. Patience is key—focus on blending that color in without overworking the dough.
Patience with Drying Time
After shaping your mints, let them air-dry for at least a few hours (or overnight) to achieve that classic firm texture. If you’re in a hurry, try placing them in a cool, dry spot—this helps speed up the process. Remember, good things come to those who wait!
Additional Resources
For more about successful candy-making techniques, you might find these tips from Serious Eats helpful. Happy cooking!
Serving Suggestions for Old-Fashioned Butter Mints
Creative Ways to Present Mints
When it comes to serving old-fashioned butter mints, presentation can really elevate your gathering. Consider using delicate mini candy dishes or charming glass jars; these not only keep the mints accessible but also add a nostalgic touch to your table decor. You could wrap individual mints in colorful tissue paper and secure them with decorative twine for a personalized favor at a wedding or party. For a festive flair during the holidays, arrange them on a tiered serving stand alongside other sweets, creating a delightful candy buffet everyone will adore.
Pairing Mints with Coffee or Tea
Don’t underestimate the pairing of old-fashioned butter mints with your favorite warm beverages. Whether you prefer a robust coffee or a soothing herbal tea, these mints serve as a charming palate cleanser. Try serving them with a rich, creamy latte or a floral chamomile tea. The sweetness of the mints complements the flavors beautifully, making for a delightful afternoon treat.
If you want to explore more pairing options, check out this guide on tea and mint pairings for inspiration!
Time Breakdown for Old-Fashioned Butter Mints
When you’re in the mood for a delightful, homemade treat, here’s how to plan your time for old-fashioned butter mints.
Preparation Time
You’ll need about 20 minutes to gather your ingredients and create your buttery mint mixture. Gather all your tools and let’s make this a fun project!
Drying Time
After shaping your mints, they require about 1-2 hours to dry. This is where patience pays off as they firm up into those cute little bites of bliss!
Total Time
In total, expect around 1 hour and 20 minutes from start to finish, including drying time. Perfect for a cozy afternoon at home! To learn more about the science of candy making, check out this insightful article on How Candy is Made for some fun facts. Happy mint-making!
Nutritional Facts for Old-Fashioned Butter Mints
Serving Size Details
When it comes to enjoying old-fashioned butter mints, moderation is key. A typical serving size is about 4 mints. This allows you to satisfy your sweet tooth without overdoing it—after all, they are quite rich!
Breakdown of Calories and Ingredients
In each serving of old-fashioned butter mints, you’ll find approximately 150 calories, making them a delightful treat without tipping the scales. Here’s a quick breakdown of the essential ingredients and their contributions:
- Sugar: The primary ingredient, providing sweetness and enjoyment.
- Butter: Adds a rich creaminess, along with healthy fats.
- Corn Syrup: Helps achieve that perfect chewy texture.
- Flavoring: Typically peppermint, which brings freshness and a burst of flavor.
For more detailed insights on nutrition, you can check out the USDA FoodData Central here. It’s a great resource to truly understand what you’re indulging in!
Taking a moment to consider these nutritional facts helps you enjoy your homemade goodies mindfully. Happy mint-making!
FAQs about Old-Fashioned Butter Mints
How long do homemade butter mints last?
When you whip up a batch of old-fashioned butter mints, you want to enjoy them for as long as possible! Typically, these delightful confections can last for about two weeks when stored in an airtight container at room temperature. If you live in a particularly humid area, consider refrigerating them; just be aware that cold can alter their texture a bit, making them less creamy.
Can I freeze butter mints?
Absolutely, you can freeze your butter mints! This is a fantastic way to save any extras for future indulgence. To freeze, lay the mints in a single layer on a baking sheet and place them in the freezer until solid. Then, transfer them to a freezer-friendly bag or container. They can last up to three months in the freezer. Just remember to let them come to room temperature before enjoying them again!
What can I use if I don’t have peppermint extract?
No peppermint extract? No problem! You can easily substitute with other extracts. Try using spearmint, wintergreen, or even vanilla for a different twist on your old-fashioned butter mints. If you’re feeling adventurous, fresh mint leaves can work too; just crush them to release their oils and infuse them into your mixture.
These FAQs should help you make the most of your old-fashioned butter mints. For more tips and tricks, check out Serious Eats and The Spruce Eats for additional insights!
Conclusion on Old-Fashioned Butter Mints
Summing up the charm of homemade mints
There’s something truly special about crafting your own old-fashioned butter mints. The simplicity of the ingredients combined with the joy of personalizing flavors makes them a delightful addition to any gathering. Whether you choose to stick to the classic mint flavor or experiment with something unique, the joy of sharing these handmade treats creates a sense of nostalgia and warmth.
Encouragement to try the recipe
I strongly encourage you to roll up your sleeves and give this recipe a go. Not only are old-fashioned butter mints a fantastic way to impress your friends, but they also offer an opportunity for fun in the kitchen. If you’re seeking a refreshing treat or a thoughtful gift, these mints are sure to be a hit. So why not start a new tradition and savor the sweet success of making your own? For more inspiration, be sure to check out The Spruce Eats for other decadent homemade treats!
Print
Old-Fashioned Butter Mints Recipe: Sweet Nostalgia Made Easy
- Total Time: 24 hours 20 minutes
- Yield: 40 mints 1x
- Diet: Vegetarian
Description
Enjoy the delightful taste of Old-Fashioned Butter Mints that bring back sweet memories. This easy recipe allows you to create these nostalgic treats in no time!
Ingredients
- 1/2 cup unsalted butter
- 4 cups powdered sugar
- 1/4 cup sweetened condensed milk
- 1 teaspoon peppermint extract
- 1/2 teaspoon vanilla extract
- Food coloring (optional)
Instructions
- In a mixing bowl, cream the unsalted butter until smooth.
- Gradually add the powdered sugar, mixing until fully combined.
- Mix in the sweetened condensed milk, peppermint extract, and vanilla extract until smooth.
- If desired, divide the mixture and add food coloring to each portion.
- Form the mixture into small, bite-sized mints and place them on parchment paper.
- Let the mints dry for at least 24 hours before serving.
Notes
- Store the mints in an airtight container.
- You can customize the flavors by using different extracts.
- Prep Time: 20 minutes
- Cook Time: 0 minutes
- Category: Candy
- Method: No-Bake
- Cuisine: American
Nutrition
- Serving Size: 2 mints
- Calories: 90
- Sugar: 12g
- Sodium: 5mg
- Fat: 4g
- Saturated Fat: 3g
- Unsaturated Fat: 1g
- Trans Fat: 0g
- Carbohydrates: 12g
- Fiber: 0g
- Protein: 0g
- Cholesterol: 15mg
Keywords: Old-Fashioned Butter Mints, butter mints, nostalgic candy, easy recipe