Introduction to Red Velvet Cheesecake Layer Cake
What is Red Velvet Cheesecake Layer Cake?
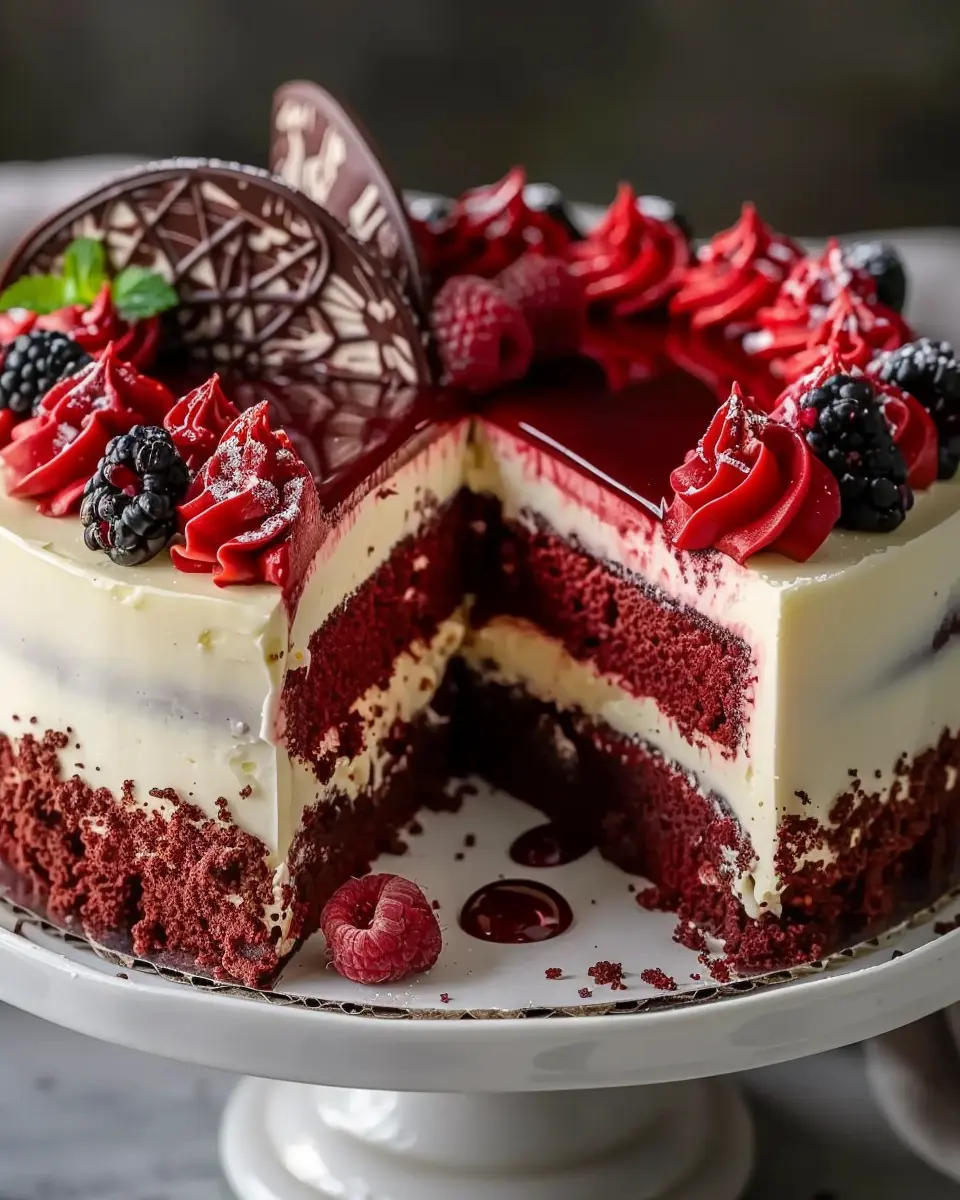
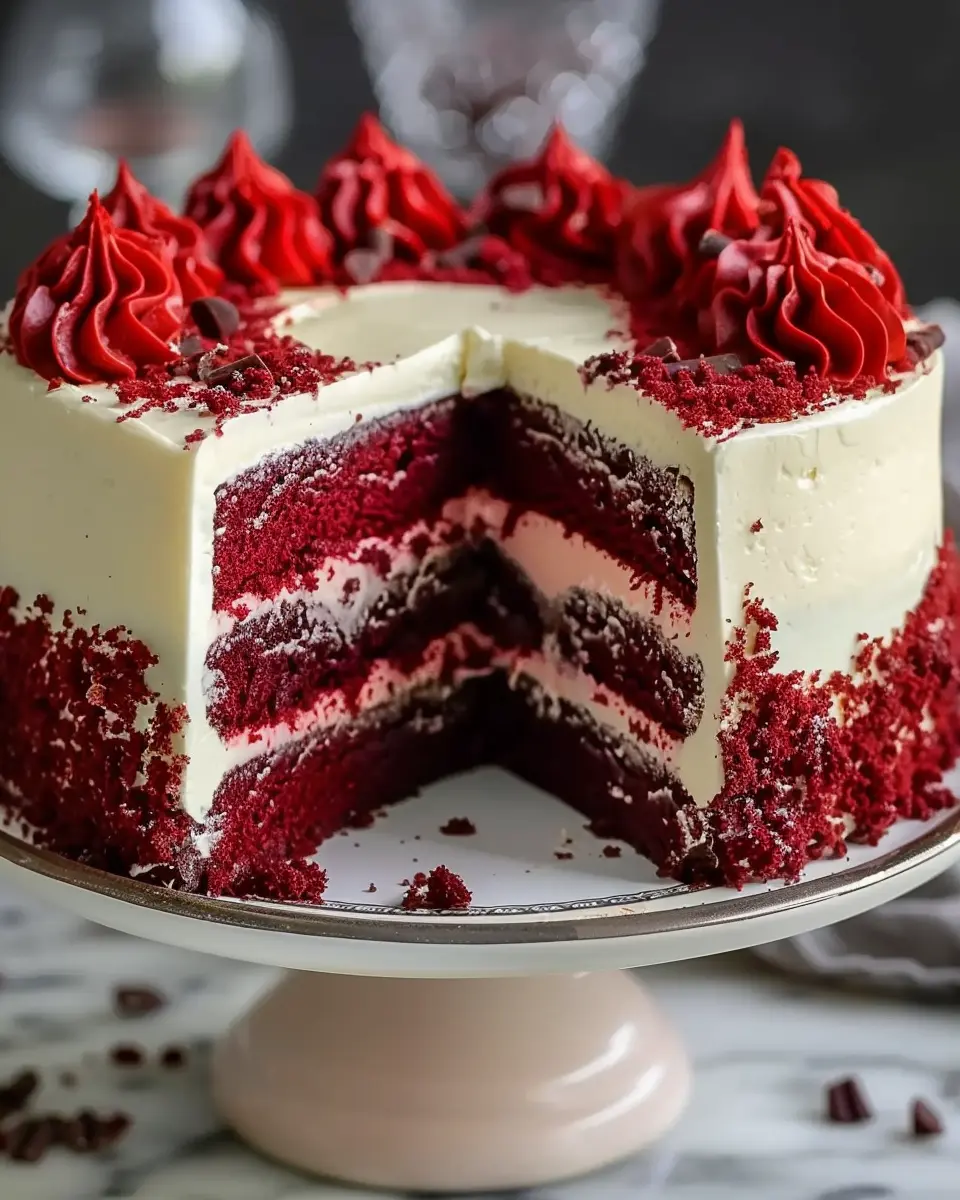
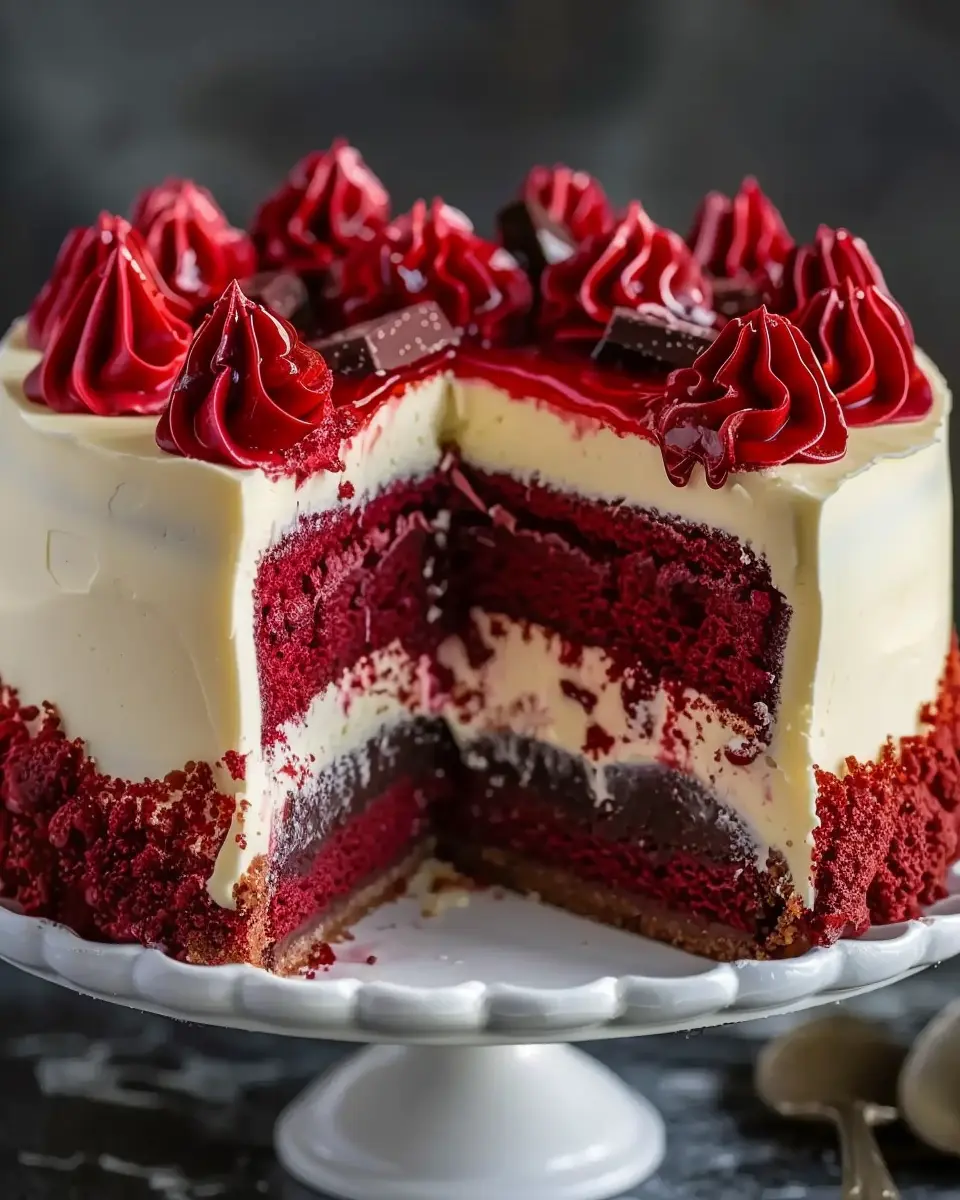
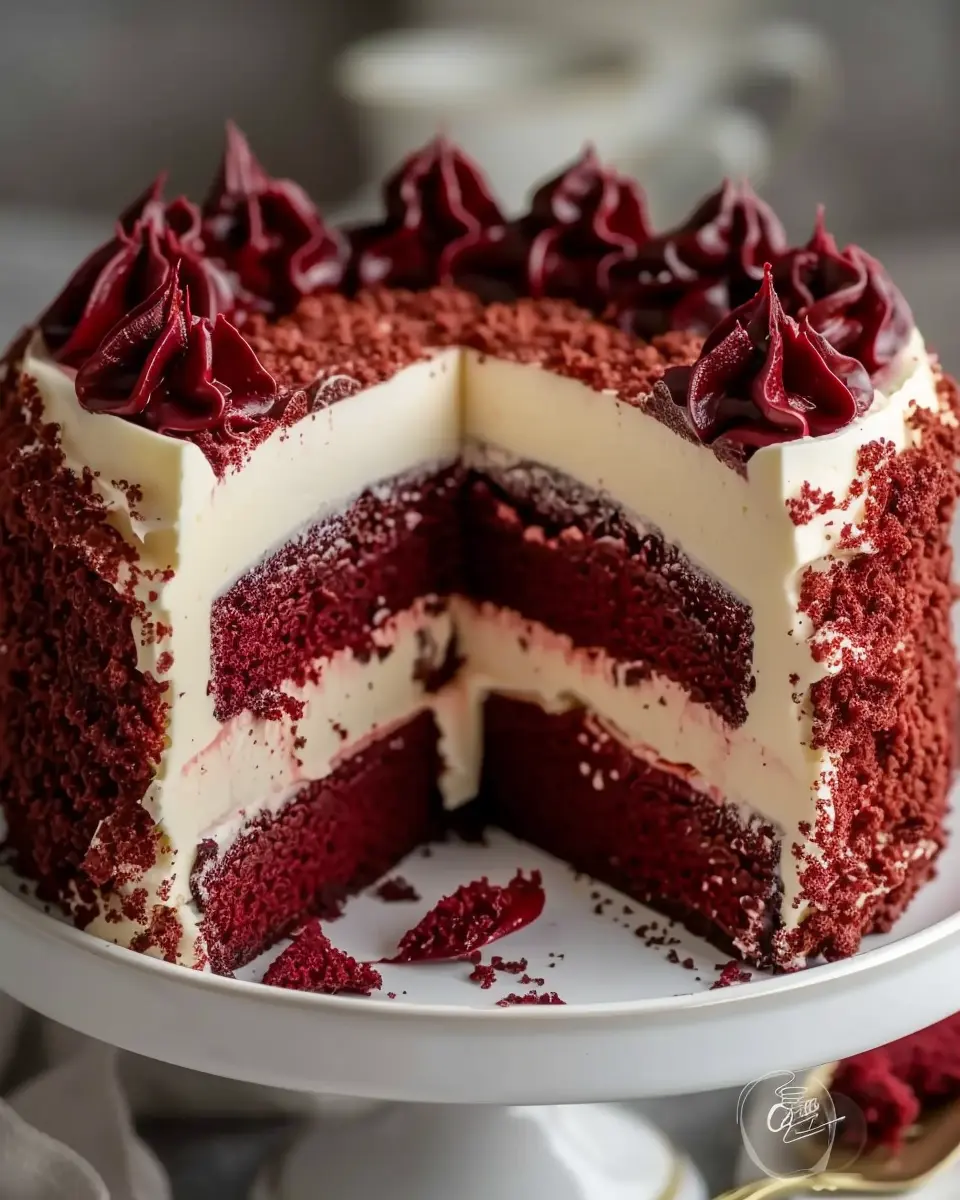
Red Velvet Cheesecake Layer Cake combines two indulgent desserts into one incredible experience. Imagine a rich, velvety red velvet cake layered with a creamy, tangy cheesecake—an exquisite treat that pleases both the eye and the palate. The cake’s deep crimson color, coupled with the smooth white cheesecake layers, creates a striking contrast that’s perfect for celebrations or a cozy get-together. For an in-depth look at the roots of this delightful dessert, you might find this History of Red Velvet Cake article useful.
Why is this cake perfect for young professionals?
Navigating a busy lifestyle as a young professional can sometimes feel like a juggling act. Whether you’re managing work deadlines, social engagements, or simply winding down after a long day, this red velvet cheesecake layer cake is your ideal companion. Here’s why:
-
Easy to Share: This cake is perfect for gatherings. You can impress friends and colleagues with its gorgeous appearance while keeping the portion sizes manageable.
-
Impressive and Fun: It’s a showstopper at any gathering, yet it’s surprisingly easy to make. You’ll feel like a pastry chef without spending all day in the kitchen.
-
Flexible Recipe: You can customize flavors by adding extracts or fillings, catering to your group’s taste preferences. Personalization makes it feel even more special.
A Personal Anecdote about Baking with Friends
I still remember the first time I tried baking a red velvet cheesecake layer cake with my close friends during a chilly autumn weekend. We gathered at my apartment, laughter filling the space as we measured flour and mixed in the vibrant red cocoa. As the cake layers baked, our kitchen was filled with the comforting aroma of sweetness mingled with a hint of vanilla.
That experience was not just about creating a dessert; it was about bonding over flour-covered countertops and shared laughter. We ended up with a beautifully layered cake that we proudly devoured while reminiscing about our college days. Whenever I bake this cake now, I think of how food brings people together, and it reminds me that cooking can be just as rewarding as the final product.
For anyone looking to create their own memories while enjoying a slice of this delicious cake, be sure to grab your favorite friends and a few essential baking supplies. You won’t regret it!
Ingredients for Red Velvet Cheesecake Layer Cake
Creating a stunning red velvet cheesecake layer cake requires a few key ingredients that come together to form a delicious blend of flavors and textures. Let’s dive into what you’ll need to whip up this masterpiece!
Key Ingredients List
-
For the Red Velvet Cake:
-
All-purpose flour
-
Granulated sugar
-
Cocoa powder
-
Baking powder and baking soda
-
Salt
-
Vegetable oil
-
Buttermilk
-
Eggs
-
Vanilla extract
-
Red food coloring (for that signature hue)
-
For the Cream Cheese Cheesecake Layer:
-
Cream cheese (softened)
-
Sugar
-
Eggs
-
Vanilla extract
-
A splash of lemon juice (for a tangy kick)
Don’t forget a dash of salt in your cheesecake mix; it balances the sweetness beautifully!
Optional Ingredients for a Unique Twist
Looking to elevate your red velvet cheesecake layer cake? Try adding:
- Chopped walnuts or pecans for some crunch.
- A drizzle of caramel or chocolate sauce as a finishing touch.
- Flavored extracts, like almond or coffee, to give it a personal flair.
Feeling adventurous? You can even experiment with different food colorings for a vibrant vacation from tradition! For more unique ideas, check out this guide on flavor pairings that will inspire your culinary creativity.
With these ingredients in hand, you’re well on your way to impressing friends and family with a dessert that’s as visually stunning as it is delicious!
Step-by-step preparation of Red Velvet Cheesecake Layer Cake
Creating a red velvet cheesecake layer cake is not only about the delectable flavor combinations; it’s also about the joy of baking. With its rich layers of red velvet cake and creamy cheesecake, it’s bound to impress anyone who gets their hands on a slice. Ready to get started? Let’s dive into the preparation step by step.
Preparing the chocolate cookie crust
First things first, let’s whip up the chocolate cookie crust. This addition adds a delightful crunch and contrasts beautifully with the creamy cheesecake layers.
- Ingredients:
- 1 ½ cups chocolate cookie crumbs (store-bought or homemade)
- ½ cup unsalted butter, melted
- 2 tablespoons granulated sugar
-
Preheat your oven to 350°F (175°C). Grease a 9-inch springform pan and set it aside.
-
In a medium bowl, combine the chocolate cookie crumbs, melted butter, and sugar. Stir until the crumbs are evenly coated and resemble wet sand.
-
Firmly press the mixture into the bottom of the prepared springform pan. Don’t be shy—make sure it’s compact!
-
Bake for about 10 minutes until set, then allow it to cool while you move on to the cake layers.
Baking the red velvet cake layers
The next step in crafting your red velvet cheesecake layer cake is baking the velvety cake layers. Trust me, the aroma of red velvet batter in the oven is simply heavenly.
- Ingredients:
- 2 ½ cups all-purpose flour
- 1 ½ cups granulated sugar
- 1 teaspoon baking soda
- 1 teaspoon salt
- 1 teaspoon cocoa powder
- 1 ½ cups vegetable oil
- 1 cup buttermilk, at room temperature
- 2 large eggs
- 2 tablespoons red food coloring
- 1 teaspoon vanilla extract
- 1 teaspoon white vinegar
-
In a mixing bowl, sift together flour, sugar, baking soda, salt, and cocoa powder.
-
In another bowl, whisk together the oil, buttermilk, eggs, food coloring, vanilla, and vinegar.
-
Combine the wet and dry mixtures, stirring until just combined. Avoid overmixing to keep your cake soft and tender.
-
Dividing equally, pour the batter into two 9-inch round cake pans. Bake for 25-30 minutes or until a toothpick comes out clean. Let the cakes cool for at least 10 minutes before removing them from the pans.
Making the cheesecake layer
While the cakes cool, let’s focus on that luscious cheesecake layer. Your guests won’t know what hit them!
- Ingredients:
- 16 oz cream cheese, softened
- 1 cup granulated sugar
- 2 large eggs
- 1 teaspoon vanilla extract
-
Preheat your oven again, this time to 325°F (160°C). Line the bottom of a 9-inch springform pan with parchment paper.
-
In a large mixing bowl, beat the softened cream cheese until smooth. Gradually add sugar, mixing until dissolved.
-
Add the eggs, one at a time, then the vanilla. Mix until well combined.
-
Pour the cheesecake batter into the prepared pan and bake for about 50-60 minutes. The center should still be slightly jiggly. Turn off the oven and leave the cheesecake inside for an additional hour.
Assembling the cake layers
Now comes the fun part: assembling your masterpiece! Your red velvet cheesecake layer cake is almost ready to shine.
-
Remove the cheesecake from the oven and allow it to cool completely, then refrigerate it for at least four hours, or overnight if possible.
-
Place one layer of red velvet cake on a serving plate, then top it with the chilled cheesecake layer. Carefully peel off the springform edges if needed.
-
Add the second layer of red velvet cake on top.
Final frosting and decoration
To elevate your cake, let’s add some frosting and give it a beautiful finish.
- For the frosting:
- 1 cup unsalted butter, softened
- 4 cups powdered sugar
- 1 teaspoon vanilla extract
- 2 tablespoons heavy cream
-
In a mixing bowl, beat the softened butter until creamy. Gradually add powdered sugar, mixing well.
-
Add the vanilla and heavy cream, beating until smooth and fluffy.
-
Frost the top and sides of the cake, using a spatula to create a swirl pattern or leave it smooth and elegant.
-
Consider decorating with white chocolate shavings or fresh berries for an extra pop of color.
Voila! Your red velvet cheesecake layer cake is complete! Slice into this delicious creation at your next gathering, and watch it disappear. For a more comprehensive guide, feel free to check out how to make the perfect cream cheese frosting. Happy baking!
Variations on Red Velvet Cheesecake Layer Cake
Exploring Flavor Bases for Your Cake
One of the beautiful aspects of a red velvet cheesecake layer cake is its versatility. Feel free to switch things up with different flavor bases. For example, if you want to enhance the cake’s richness, consider pairing it with a chocolate or espresso flavor. For a tropical twist, a hint of coconut or pineapple can take your dessert to a whole new level. Adding spices like cardamom or cinnamon can also create an exciting flavor profile. Just remember to adjust ingredients accordingly, as these flavors can vary in sweetness!
Making Gluten-Free Adjustments
Catering to gluten-free diets doesn’t mean sacrificing flavor! You can easily make your red velvet cheesecake layer cake gluten-free by using a high-quality gluten-free flour blend. Brands like Bob’s Red Mill offer excellent alternatives that mimic all-purpose flour well. Additionally, ensure that any packed ingredients, like baking powder or frosting, are also gluten-free, allowing everyone to indulge without worry.
Healthier Substitutions for a Guilt-Free Slice
Want to enjoy a slice without the guilt? There are several substitutions you can try! Use Greek yogurt instead of cream cheese for frosting; it’s lower in calories and adds protein. For a more wholesome cake, consider swapping out all-purpose flour for almond flour or whole grain flour. And if you’re looking to cut sugar, try using natural sweeteners like honey or agave syrup. According to a study by the Harvard School of Public Health, these alternatives can have a lower glycemic index, making them better options for your health.
Ultimately, the red velvet cheesecake layer cake can be as unique as you desire. So, why not experiment and find your perfect version?
Cooking Tips and Notes for Red Velvet Cheesecake Layer Cake
Common Pitfalls to Avoid
When crafting your red velvet cheesecake layer cake, one of the most common mistakes is overmixing the batter. This can lead to a dense texture instead of the desired lightness. Additionally, be cautious with your food coloring; too much can overpower the cake. Finally, always allow your cheesecake layer to cool before stacking—this helps prevent a soggy bottom!
Equipment Recommendations
Having the right tools makes all the difference. Consider using a springform pan for your cheesecake, as it allows for easy removal. A stand mixer is also a great asset for achieving a smooth batter. Don’t forget to invest in an offset spatula for those neat, professional-looking cake layers.
How to Ensure Your Cheesecake Layer Sets Perfectly
To achieve that perfect set for your cheesecake layer, use room temperature ingredients—this promotes even mixing. Consider adding cornstarch to the filling as it helps stabilize the texture. Lastly, bake your cheesecake in a water bath to maintain a moist environment. This method is endorsed by experts and can help you achieve that creaminess you’re aiming for.
Remember, patience is key, so take your time and enjoy the process! For more tips, check out this guide on baking techniques. Happy baking!
Serving suggestions for Red Velvet Cheesecake Layer Cake
Perfect occasions for serving this cake
The red velvet cheesecake layer cake truly shines at any gathering, but it’s particularly perfect for celebrations that call for a touch of elegance. Consider serving this cake at:
- Birthdays or milestone celebrations for a sweet surprise
- Holiday dinners where a festive dessert is a must
- Bridal or baby showers for a delightful centerpiece
- Cozy gatherings with friends or family when you want to impress
No matter the occasion, the vibrant red layers and creamy cheesecake filling will wow your guests and create unforgettable moments.
Pairing ideas for a delightful experience
To elevate your serving experience with the red velvet cheesecake layer cake, match it with refreshing, non-alcoholic beverages. Here are some delightful pairings:
- Sparkling water infused with fresh berries for a refreshing touch
- Creamy vanilla iced lattes that complement the cake’s richness
- Classic hot chocolate drizzled with whipped cream for a cozy feel
- Sweet mint lemonade for a zesty twist
These drinks not only balance the cake’s sweetness but also add to the overall enjoyment. Why not explore more pairing ideas on popular culinary sites like Food52 or Serious Eats? Let your creativity flow and elevate your dessert game!
Time breakdown for making Red Velvet Cheesecake Layer Cake
When you’re diving into the delightful world of baking a red velvet cheesecake layer cake, it helps to plan your time wisely. Here’s a quick breakdown to make your baking experience smooth and enjoyable.
Preparation time
Gathering your ingredients and prepping your workspace will take about 30 minutes. This includes measuring out flour, sugar, and all the cream cheese goodness you’ll need for that luscious cheesecake layer. A little organization goes a long way!
Baking time
Once everything is prepped, the baking process will take approximately 30 to 40 minutes. You’ll want to keep a close eye on your cake layers as they bake—they should rise beautifully and have that signature red hue.
Chilling time
After baking, patience is key! Allow the cake layers to cool for about 20 minutes in the pan before transferring them to a wire rack. For the cheesecake layer, give it at least 4 hours (or better yet, overnight) in the fridge to set properly. Trust me, this makes a big difference in flavor and texture.
By breaking down the time, you’ll find it easier to create a red velvet cheesecake layer cake that’s the star of any dessert table. If you’re eager for more tips on perfecting your baking skills, check out resources like Serious Eats or Bon Appétit for expert insights!
Nutritional facts for Red Velvet Cheesecake Layer Cake
Calories per slice
When indulging in a slice of red velvet cheesecake layer cake, you’re looking at approximately 350 calories per generous serving. That’s not too shabby for a dessert that’s sure to impress at any gathering! Of course, if you’re keeping tabs on your daily intake, portion control can make a significant difference.
Breakdown of key nutrients
What makes this cake even more delightful is that it provides a mix of nutrients along with those calories. Here’s a quick breakdown:
- Protein: Roughly 5 grams per slice, thanks to the creamy cheesecake layer.
- Carbohydrates: About 45 grams, making it a satisfying treat.
- Fat: Approximately 18 grams, offering that rich, decadent texture we crave.
Looking for healthier dessert options? Websites like Healthline offer insights into how to balance treats like this cake with your nutrition goals. Remember, enjoying a slice of red velvet cheesecake layer cake occasionally is perfectly fine—balance is key!
FAQ about Red Velvet Cheesecake Layer Cake
How can I store the leftover cake?
Storing your red velvet cheesecake layer cake properly is essential for maintaining its deliciousness. If you have leftovers, wrap the cake tightly in plastic wrap or place it in an airtight container. It can be stored in the refrigerator for up to five days. For longer storage, consider freezing individual slices. Just make sure to wrap them well in plastic and then in aluminum foil. They can stay good in the freezer for about three months. When ready to enjoy, simply thaw in the refrigerator overnight.
Can I make this cake ahead of time?
Absolutely! In fact, making your red velvet cheesecake layer cake a day or two in advance can enhance its flavors as they meld together over time. Prepare and assemble the cake, then wrap it tightly and store it in the fridge. You can also bake the layers ahead of time and freeze them until you’re ready to frost and assemble. Just be sure to let them cool completely before wrapping to avoid condensation.
What’s the best way to slice a layered cake?
Slicing a layered cake can seem daunting, but with these simple tips, you’ll be a pro in no time:
- Use a hot knife: Dip a sharp knife in hot water and dry it before slicing. This helps achieve clean cuts through the cream cheese frosting and layers.
- Wipe the knife: After each slice, wipe the knife clean to prevent crumbs from mixing into the frosting.
- Cut gently: Use a sawing motion rather than pressing down hard to avoid squishing the layers.
These small steps can help ensure that your red velvet cheesecake layer cake looks just as fabulous on the plate as it does in your imagination!
If you need more tips or tricks, check out this cake slicing guide.
Conclusion on Red Velvet Cheesecake Layer Cake
Recap on why this cake is a must-try for young professionals
Every bite of this red velvet cheesecake layer cake promises a delightful experience, merging the velvety richness of classic red velvet with the creamy indulgence of cheesecake. As young professionals, you undoubtedly appreciate the joy of treating yourself after a long week. This cake is not just a dessert; it’s a celebration of your achievements, big and small. The vibrant colors and decadent flavors are bound to impress both friends and coworkers alike, making it the perfect centerpiece for gatherings or a sweet reward for your hard work.
Encouraging readers to share their baking experiences
Now that you’re equipped with all the tips and tricks to nail this stunning cake, we want to hear from you! Have you put your own spin on the red velvet cheesecake layer cake? What challenges did you face, and how did it turn out? Your stories can inspire fellow bakers in our community. Join our conversation on social media, or drop a comment below to share your successes and any creative variations you’ve tried. Happy baking!
Print
Red Velvet Cheesecake Layer Cake: The Best Indulgence for Home Cooks
- Total Time: 1 hour
- Yield: 12 servings 1x
- Diet: Vegetarian
Description
Indulge in this delicious Red Velvet Cheesecake Layer Cake, perfect for special occasions or just a sweet treat at home.
Ingredients
- 2 cups all-purpose flour
- 1 1/2 cups granulated sugar
- 1 teaspoon baking soda
- 1 teaspoon salt
- 1 teaspoon cocoa powder
- 1 1/2 cups vegetable oil
- 1 cup buttermilk
- 2 large eggs
- 2 tablespoons red food coloring
- 1 teaspoon vanilla extract
- 1 teaspoon white vinegar
Instructions
- Preheat the oven to 350°F (175°C). Grease and flour three 9-inch round cake pans.
- In a large bowl, mix together the flour, sugar, baking soda, salt, and cocoa powder.
- Add the oil, buttermilk, eggs, food coloring, vanilla, and vinegar. Beat on medium speed until well combined.
- Divide the batter evenly among the prepared cake pans.
- Bake for 25-30 minutes or until a toothpick inserted into the center comes out clean.
- Let the cakes cool in the pans for 10 minutes, then transfer to wire racks to cool completely.
- For the cheesecake layer, prepare according to your preferred cheesecake recipe.
- Once the cakes and cheesecake have cooled, layer them as desired, spreading frosting between each layer.
Notes
- Let the cake sit for a few hours before serving to enhance flavor.
- You can use cream cheese frosting for a richer taste.
- Prep Time: 30 minutes
- Cook Time: 30 minutes
- Category: Dessert
- Method: Layer Cake
- Cuisine: American
Nutrition
- Serving Size: 1 slice
- Calories: 500
- Sugar: 50g
- Sodium: 300mg
- Fat: 25g
- Saturated Fat: 10g
- Unsaturated Fat: 15g
- Trans Fat: 0g
- Carbohydrates: 60g
- Fiber: 2g
- Protein: 6g
- Cholesterol: 70mg
Keywords: red velvet, cheesecake, layer cake, dessert recipe